Mercury
The illustration on the right side of this page shows the Dendera Zodiac in its natural state with no rotations applied to the stones and with the God that represents Mercury highlighted
in the night sky circle. The decryption rotations need to be applied to the stone circles to be able to start to analyse the manner in which the planet Mercury is encoded into the carving,
which can be performed by clicking the next button.
The illustration on the right of the page now shows the Dendera Zodiac in its unencrypted state with the celestial axes from the Moon analysis drawn in white, the X and Y axes of the sculpture drawn in black, and the apsis line of the Moon drawn in yellow. The focal points of The Moon's elliptical orbit are marked with two small circles, one of which is in the center of the sculpture and represents The Earth and one located on the elbow of the Mercury God.
The first item to notice is that the staff that the Mercury God is holding in his left hand is aligned to celestial North. This can be shown by adding a line to the illustration which starts from the the bottom of the inner ridge of the outer hieroglyph stone ring on the Y axis and which is drawn at an angle of 0° relative to the celestial North direction. Click the following button to add the staff line and the marker point at the bottom of the hieroglyph ring on the Y axis.
You can zoom in to see the Mercury God in detail by clicking the next button.
The apsis line of The Moon passes along the God's forearm, the celestial North aligned geometric staff line from the bottom of the carving runs up the right side of the God's staff and the focal point of The Moon is located at the Mercury God's elbow. The purpose of these geometric alignments is to ensure that the whole of The Moon system and the stone decryption has been correctly solved prior to tackling the first of the planet systems. The position of the staff of the Mercury God uses the Dendera Zodiac's hieroglyph circle radius and the angle of the line uses the orbit tilt of The Moon in its formation. The apsis line of The Moon requires the projected longitude of the ascending node and the argument of periapsis of The Moon to be known prior to being drawn and so it is impossible to draw what is currently on the illustration without first having solved The Moon system which provides the framework in which the night sky is set. Zoom back out again using the next button.
The next step in solving the planet Mercury carvings is to remember that it is a puzzle, and that whoever designed it is deliberately obfuscating the data and making the puzzle difficult to solve, whilst at the same time keeping the astronomical concepts and data contained within it in a pure state. The last thing that you expect to have to do at this stage is to change the direction of celestial North, however that is exactly what has been done at the start of the Mercury planet puzzle design.
The celestial North direction needs to be realigned so that North, for Mercury, is aligned along the apsis line of The Moon, with North at the lower right of the sculpture. Also, the center of the geometric system needs to be moved from the center of the carving at the intersection of the X and Y axes to the point on the God's hand where the staff line and the Moon's apsis line intersect. This realignment of celestial North can be shown by rotating the celestial axes into position whilst moving the axes intersection point, by clicking the following button.
The reason for moving the intersection of the celestial axes away from the geometric center of the sculpture is because the center of the Dendera Zodiac now represents The Sun, and Mercury is rotating around that center point and requires the axes to pass through the planet center to form the local coordinate system. However there is another fact that needs determining at this stage because the planets do not rotate around the geometric center of The Sun but around the center of mass at the solar system barycenter, known in the DE441 ephemeris by the code 'SSB'. The distinction is vitally important when looking up planetary data in DE441 because the coordinate center used for outputting the numerical data can be set to either The Sun center or the solar system Barycenter. By moving the celestial axes to where the carving of Mercury is located the architects are making you think about whether The Sun or the SSB is being used as the coordinate center for the ephemeris. By trying to solve the Mercury puzzle using both of these options it becomes apparent that it must be The Sun body center that is the correct option because the geometry that is about to be presented and the associated data extraction only works with Sun centered DE441 ephemeris data.
The illustration on the right of the page now shows the Dendera Zodiac in its unencrypted state with the celestial axes from the Moon analysis drawn in white, the X and Y axes of the sculpture drawn in black, and the apsis line of the Moon drawn in yellow. The focal points of The Moon's elliptical orbit are marked with two small circles, one of which is in the center of the sculpture and represents The Earth and one located on the elbow of the Mercury God.
1) RESOLVING MERCURY'S FRAMEWORK
The first item to notice is that the staff that the Mercury God is holding in his left hand is aligned to celestial North. This can be shown by adding a line to the illustration which starts from the the bottom of the inner ridge of the outer hieroglyph stone ring on the Y axis and which is drawn at an angle of 0° relative to the celestial North direction. Click the following button to add the staff line and the marker point at the bottom of the hieroglyph ring on the Y axis.
You can zoom in to see the Mercury God in detail by clicking the next button.
The apsis line of The Moon passes along the God's forearm, the celestial North aligned geometric staff line from the bottom of the carving runs up the right side of the God's staff and the focal point of The Moon is located at the Mercury God's elbow. The purpose of these geometric alignments is to ensure that the whole of The Moon system and the stone decryption has been correctly solved prior to tackling the first of the planet systems. The position of the staff of the Mercury God uses the Dendera Zodiac's hieroglyph circle radius and the angle of the line uses the orbit tilt of The Moon in its formation. The apsis line of The Moon requires the projected longitude of the ascending node and the argument of periapsis of The Moon to be known prior to being drawn and so it is impossible to draw what is currently on the illustration without first having solved The Moon system which provides the framework in which the night sky is set. Zoom back out again using the next button.
The next step in solving the planet Mercury carvings is to remember that it is a puzzle, and that whoever designed it is deliberately obfuscating the data and making the puzzle difficult to solve, whilst at the same time keeping the astronomical concepts and data contained within it in a pure state. The last thing that you expect to have to do at this stage is to change the direction of celestial North, however that is exactly what has been done at the start of the Mercury planet puzzle design.
The celestial North direction needs to be realigned so that North, for Mercury, is aligned along the apsis line of The Moon, with North at the lower right of the sculpture. Also, the center of the geometric system needs to be moved from the center of the carving at the intersection of the X and Y axes to the point on the God's hand where the staff line and the Moon's apsis line intersect. This realignment of celestial North can be shown by rotating the celestial axes into position whilst moving the axes intersection point, by clicking the following button.
The reason for moving the intersection of the celestial axes away from the geometric center of the sculpture is because the center of the Dendera Zodiac now represents The Sun, and Mercury is rotating around that center point and requires the axes to pass through the planet center to form the local coordinate system. However there is another fact that needs determining at this stage because the planets do not rotate around the geometric center of The Sun but around the center of mass at the solar system barycenter, known in the DE441 ephemeris by the code 'SSB'. The distinction is vitally important when looking up planetary data in DE441 because the coordinate center used for outputting the numerical data can be set to either The Sun center or the solar system Barycenter. By moving the celestial axes to where the carving of Mercury is located the architects are making you think about whether The Sun or the SSB is being used as the coordinate center for the ephemeris. By trying to solve the Mercury puzzle using both of these options it becomes apparent that it must be The Sun body center that is the correct option because the geometry that is about to be presented and the associated data extraction only works with Sun centered DE441 ephemeris data.
2) SOLVING MERCURY USING NASA DATA
With the encryption and design of the carving now fully resolved and the rotated celestial North axis positioned on the carving, the ephemeris data for Mercury from the DE441 database, referenced relative to The Sun body center at the time of the geometric winter solstice of The Moon in 2729 BCE, can now be tabulated so that there is a starting point for the analysis of the planet Mercury.

Mercury
Standard Gravitational Parameter (GM):
Ephemeris:
Event:
Date:
System center:
Reference frame:
Reference plane:
Standard Gravitational Parameter (GM):
Ephemeris:
Event:
Date:
System center:
Reference frame:
Reference plane:
Osculating elements
e
Orbit eccentricity
QR
Periapsis distance (AU)
IN
Orbit Inclination (deg)
OM
Longitude of ascending node (deg)
W
Argument of periapsis (deg)
TP
Time of periapsis (JD)
N
Mean motion (deg/day)
MA
Mean anomaly (deg)
TA
True anomaly (deg)
a
Semi major axis (AU)
b
Semi minor axis (AU)
AD
Apoapsis distance (AU)
PR
Orbit period (day)
State vectors
X
X (AU)
Y
Y (AU)
Z
Z (AU)
Because Mercury has had extensive analysis performed on it by space probes and due to its inherent position inside the orbit of the Earth, the numerical values within
table 5 are known to be highly accurate. Investigation into the uncertainty in these numbers using an AI system yields, for example, that the orbit inclination uncertainty
in the year 2729 BCE has a value of around 25 milliarcseconds and the eccentricity of the orbit is correct to 10-9 varying only on the last 4 digits on display in
table 5.
The Moon's apsis line and the staff alignment line can be removed from the illustration by clicking the following button, leaving just Mercury's celestial axes on display.
The longitude of the ascending node from table 5 can now be drawn onto the illustration in its correct astronomical configuration. This angle is defined on the ICRF reference plane and needs to be projected from that reference plane onto the plane of the Moon's orbit which is the plane of the Dendera Zodiac by definition. This reduces the ascending node angle from 12.50917°, as given in the DE441 ephemeris, down to 11.83348° when projected. Click the following button to animate the angle as an arc which has its center at the the hand of the God at the intersection of the celestial axes, and a semi-arbitrary radius that places the start of the arc onto the outer hieroglyph circle.
The angle arc is shown in red with the ascending node line of Mercury's orbit shown as the red line running across the illustration and which aligns with the end of the hieroglyph section at the top of the outer ring. The argument of periapsis can now drawn onto the illustration and does not require projecting from the orbital plane of Mercury onto the orbital plane of the Moon as it is being applied as a simple geometric angle only and not as a construct of celestial mechanics. This vital fact is established in the architecture using a checking mechanism which appears shortly. The argument of periapsis line can be added by clicking the next button.
The arc angle is in green and the apsis line of Mercury is shown by the green line that runs across the illustration. Because the green line is the periapsis line of Mercury, the focal points of the elliptical orbit of Mercury can be drawn on to it in the same manner that those for The Moon were drawn previously, by using the outer radius of the circular outer hieroglyph ring to represent the semi-major axis of the orbit ellipse and then calculating the position of the focal points using the DE441 data applied to that radius.
The true anomaly angle can now be drawn in blue and the angle terminated with a line running across the carving which represents the position of Mercury on its orbit at the time of the geometric winter solstice of 2729 BCE. This angle, which is also a pure geometric construct and does not require projecting, can be added by clicking the next button.
On first inspection there do not appear to be any carved features that align with the green and blue lines, however an alignment mechanism does exist which requires the geometry lines to be moved. To show that the geometry has been correctly formulated, the overlaid lines and arcs can now be shifted along the apsis line so that the center of the geometry moves from the hand of the Mercury God up to the focal point that is located above the God and to the right, and an alignment carving will become highlighted.
The movement of the geometry lines just performed is astronomically correct because it now positions the center of the Mercury system at one of the focal points of the planet's orbit ellipse. The true anomaly line of Mercury and the E-W celestial axis line define the sides of the box on the Decan ring which appears to have a snake carved on the top of it. This box is the alignment box for Mercury and close inspection of the carving shows that the snake is incomplete and is carved as shown in the illustration below.
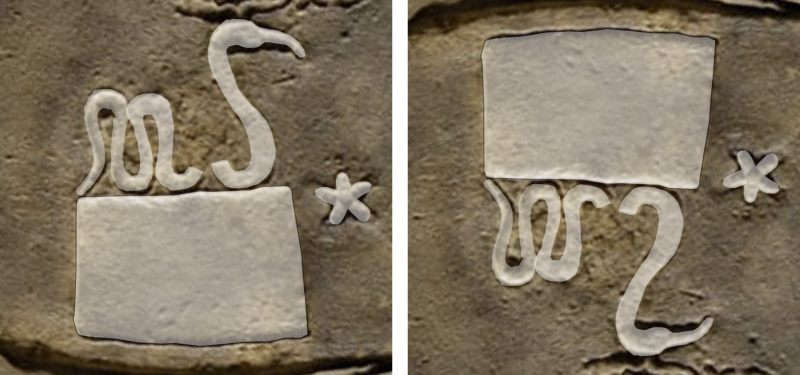
Illustration 4 - Mercury's box of snakes showing M2 and not W2
In the image on the left of illustration four the left side of the snake shows a stylised Roman letter 'M' and the head of the snake shows an upside down Roman numeral '2' identifying the alignment as being Mercury's 2nd focal point. The carving can also be inverted, as shown on the image on the right of illustration four, and then reads quite clearly as W2. Because the carving has been inverted the logic is showing 'NOT W2' which is the instruction required to know that the argument of periapsis, which is always denoted in the DE441 ephemeris with the letter 'W', does not need to be projected and the simple geometry angle 'W(1)' is required in the puzzle.
If this focal point is named 'M2' then the other focal point must be the one that should be used in the geometry as being the primary focal point 'M1' and it is therefore necessary to slide the astronomy geometry construction down to the other focal point which finally positions the axes and lines for the planet Mercury in their correct decrypted locations.
Note that the red line of Mercury's orbit ascending node now passes through the center of the base of the small marker carving on the intermediate ring of stone which shows that the geometry is correctly formed.
There is a very good reason for moving the center of the celestial axes around on the sculpture, which is done for each of the planets on the subsequent pages as well, and that is that the numerical data that is hidden in the sculpture's design relies upon alignments to the carved features around the stonework. By moving the center point for each planet the alignments of these carved features become unique, whereas if the alignment lines for each planet were to all start from the center of the carving there would be no way to determine which carved sculpture line related to which planet.
The Moon's apsis line and the staff alignment line can be removed from the illustration by clicking the following button, leaving just Mercury's celestial axes on display.
The longitude of the ascending node from table 5 can now be drawn onto the illustration in its correct astronomical configuration. This angle is defined on the ICRF reference plane and needs to be projected from that reference plane onto the plane of the Moon's orbit which is the plane of the Dendera Zodiac by definition. This reduces the ascending node angle from 12.50917°, as given in the DE441 ephemeris, down to 11.83348° when projected. Click the following button to animate the angle as an arc which has its center at the the hand of the God at the intersection of the celestial axes, and a semi-arbitrary radius that places the start of the arc onto the outer hieroglyph circle.
The angle arc is shown in red with the ascending node line of Mercury's orbit shown as the red line running across the illustration and which aligns with the end of the hieroglyph section at the top of the outer ring. The argument of periapsis can now drawn onto the illustration and does not require projecting from the orbital plane of Mercury onto the orbital plane of the Moon as it is being applied as a simple geometric angle only and not as a construct of celestial mechanics. This vital fact is established in the architecture using a checking mechanism which appears shortly. The argument of periapsis line can be added by clicking the next button.
The arc angle is in green and the apsis line of Mercury is shown by the green line that runs across the illustration. Because the green line is the periapsis line of Mercury, the focal points of the elliptical orbit of Mercury can be drawn on to it in the same manner that those for The Moon were drawn previously, by using the outer radius of the circular outer hieroglyph ring to represent the semi-major axis of the orbit ellipse and then calculating the position of the focal points using the DE441 data applied to that radius.
The true anomaly angle can now be drawn in blue and the angle terminated with a line running across the carving which represents the position of Mercury on its orbit at the time of the geometric winter solstice of 2729 BCE. This angle, which is also a pure geometric construct and does not require projecting, can be added by clicking the next button.
On first inspection there do not appear to be any carved features that align with the green and blue lines, however an alignment mechanism does exist which requires the geometry lines to be moved. To show that the geometry has been correctly formulated, the overlaid lines and arcs can now be shifted along the apsis line so that the center of the geometry moves from the hand of the Mercury God up to the focal point that is located above the God and to the right, and an alignment carving will become highlighted.
The movement of the geometry lines just performed is astronomically correct because it now positions the center of the Mercury system at one of the focal points of the planet's orbit ellipse. The true anomaly line of Mercury and the E-W celestial axis line define the sides of the box on the Decan ring which appears to have a snake carved on the top of it. This box is the alignment box for Mercury and close inspection of the carving shows that the snake is incomplete and is carved as shown in the illustration below.
Illustration 4 - Mercury's box of snakes showing M2 and not W2
In the image on the left of illustration four the left side of the snake shows a stylised Roman letter 'M' and the head of the snake shows an upside down Roman numeral '2' identifying the alignment as being Mercury's 2nd focal point. The carving can also be inverted, as shown on the image on the right of illustration four, and then reads quite clearly as W2. Because the carving has been inverted the logic is showing 'NOT W2' which is the instruction required to know that the argument of periapsis, which is always denoted in the DE441 ephemeris with the letter 'W', does not need to be projected and the simple geometry angle 'W(1)' is required in the puzzle.
If this focal point is named 'M2' then the other focal point must be the one that should be used in the geometry as being the primary focal point 'M1' and it is therefore necessary to slide the astronomy geometry construction down to the other focal point which finally positions the axes and lines for the planet Mercury in their correct decrypted locations.
Note that the red line of Mercury's orbit ascending node now passes through the center of the base of the small marker carving on the intermediate ring of stone which shows that the geometry is correctly formed.
There is a very good reason for moving the center of the celestial axes around on the sculpture, which is done for each of the planets on the subsequent pages as well, and that is that the numerical data that is hidden in the sculpture's design relies upon alignments to the carved features around the stonework. By moving the center point for each planet the alignments of these carved features become unique, whereas if the alignment lines for each planet were to all start from the center of the carving there would be no way to determine which carved sculpture line related to which planet.
3) EXTRACTING THE EPHEMERIS DATA FOR MERCURY
To start the extraction of the ephemeris data for Mercury all that is required in the celestial axes drawn in their correct location passing through the primary focal point of the orbit ellipse.
The data that is contained within the Dendera Zodiac for Mercury comprises of the six Keplerian elements (the basic requirement to describe a planet's orbit) plus the orbit period and the gravitational parameter of the planet so that the State Vectors can be calculated from the osculating elements.
The format of the data encryption is identical to that of The Moon and is consistent across all of the specified elements of the orbit of Mercury. The numerical values are split into discreet groups of digits with each group having to have a value less than 360. These discreet values are then applied as rotations starting from the celestial north direction, are plotted clockwise, and each subsequent rotation continues from where the previous rotation ended. The rotation values are always integers except for the final group which can contain a decimal portion.
It is possible to identify all of the data points that have been carved into the sculpture perfectly accurately and by the same reasoning it is possible to determine that other values from the ephemeris tables of NASA are not contained in the sculpture's design because there are no matching lines in the carving.
The eight ephemeris elements are listed below along with a series of buttons which will display the rotation angles on the illustration. The buttons are in two groups, those at the beginning are the numbers that are the same as those in the NASA DE441 ephemeris and those at the end are the corrected numbers from the Dendera Zodiac.
Rather than rotating lines around the illustration, which becomes tedious, the angles of the rotations are marked onto the illustration using circular white arrows with the angle's value written on them. Where there is no carved element on the sculpture that aligns with a rotation angle, which is the case for the starting values in each sequence of numbers, no line is drawn onto the illustration. Where there is a carved element on the Dendera Zodiac that aligns with the rotation angle being applied, a line is drawn on the illustration at this angle and the carved feature is highlighted using an elongated yellow box at the end of the line so that the underlying carving can still be seen. The angles that are projected from the ICRF onto the plane of the orbit of Mercury are shown with red text, and all other angles are shown in black text.
Click the number sequences buttons below to illustrate the encrypted angle information within the Dendera Zodiac's carving for the planet Mercury.
Longitude of the ascending node (deg)
Argument of periapsis (deg)
Mean anomaly (deg)
Orbit eccentricity
Orbit inclination (deg)
Semi minor axis (AU)
Orbital period (days)
Before extracting the final value from the stonework there are two objects that need to be highlighted on the Dendera Zodiac, just as was the case on the Moon page. The first is the plinth
on the intermediate ring of stone that has not yet been used, and the second is a carving on the outer frame that looks like accidental damage but clearly isn't.
The carving that looks like damage on the outer frame is a stylised carving of an irregularly shaped planet, with its atmosphere, and with two moons in orbit around it. The moons are small carved circles in the stonework and the one above the planet is directly above the center of the planet carving's straight edge on the outer bounding box of the Dendera Zodiac. This is the alignment point at the center of this mini planet system that is used to extract the Standard Gravitational Parameter (GM) for Mercury.
The carving that looks like damage on the outer frame is a stylised carving of an irregularly shaped planet, with its atmosphere, and with two moons in orbit around it. The moons are small carved circles in the stonework and the one above the planet is directly above the center of the planet carving's straight edge on the outer bounding box of the Dendera Zodiac. This is the alignment point at the center of this mini planet system that is used to extract the Standard Gravitational Parameter (GM) for Mercury.
GMmercury (km3 s-2)
4) THE DENDERA EPHEMERIS DATA FOR MERCURY
The full ephemeris of Mercury taken entirely from the Dendera Zodiac is shown below in table 6. The values in the table that were not directly extracted from the stonework have been calculated from the extracted values using the software than runs this website, and the state vectors section of the table has been included because the numerical output of these values is used at the start of the next page for the planet Venus.

Mercury
Standard Gravitational Parameter (GM):
Ephemeris:
Event:
Date:
System center:
Reference frame:
Reference plane:
Planet system mass:
Standard Gravitational Parameter (GM):
Ephemeris:
(DE441 conditions)
Event:
Date:
System center:
Reference frame:
Reference plane:
Planet system mass:
Osculating elements
e
Orbit eccentricity
QR
Periapsis distance (AU)
IN
OM
Longitude of ascending node (deg)
W
Argument of periapsis (deg)
TP
Time of periapsis (JD)
N
Mean motion (deg/day)
MA
Mean anomaly (deg)
TA
True anomaly (deg)
a
Semi major axis (AU)
b
Semi minor axis (AU)
AD
Apoapsis distance (AU)
PR
Orbit period (day)
State vectors
X
X (AU)
Y
Y (AU)
Z
Z (AU)